Azure API Management – Liquid Template – Escape XML Characters

Requirement:

Create an API that allows creation of customer in backend ERP.

API should be accessible publicly and secured.

Landscape:

  1. ERP is SAP and is located on a on-premise network.
  2. BizTalk is used as middleware to connect to SAP and is also located on-premise. BizTalk doesn’t have a public endpoint available.
  3. Azure API Management is deployed in Azure cloud without direct connection to on-premise network.

Solution:

  1. BizTalk to leverage WCF-BasicHttpRelay to Azure Service Bus to be able to have public endpoint.

2. Azure API management to convert the JSON Request to XML message using Liquid Template.

3. Azure API management to send the request to Azure Service Bus.

4. BizTalk receives the request in XML and send the request to SAP.

Problem:

If the JSON request contains XML reserved characters: & < > ‘ the request is failing in Azure API management.

Solution:

Add the following to the policy:

<!–Replace Reserved XML characters from Request Body–>

<find-and-replace from=”&amp;” to=”&amp;amp;” />

<find-and-replace from=”&gt;” to=”&amp;gt;” />

<find-and-replace from=”&lt;” to=”&amp;lt;” />

<find-and-replace from=”&apos;” to=”&amp;apos;” />

How to setup multi-region Azure API Management using Internal VNET configuration

If you’re looking answer for the following:

  • How to deploy Azure API Management to multiple regions?
  • How to setup Azure API management multi region with internal VNET configuration
  • How to configure Azure API management with Application Gateway

You’re in the right place.

Overview

APIM Setup

Azure components needed:

  1. 2 Traffic manager profiles. 1 for portal, 1 for gateway
  2. Application Gateway + WAF v2 (per region)
  3. Pubic IP Address for Application Gateway (per region)
  4. Certificates for portal and gateway
  5. DNS for portal and gateway
  6. Azure API Management Premium using Internal VNET configuration
  7. Virtual Network (per region)
  8. IP Address ranges (per VNET) this should be properly allocated to avoid conflict when joining this to internal network.


Prerequisite:

  1. Provision Azure API Management Premium instance.

Steps (below needs to be repeated for every region):

  1. Create VNET with 2 subnets. 1 for Application Gateway (AG) and 1 for APIM.
  2. Create public IP address (static)
  3. Follow instructions in using API management in internal configuration with application gateway (https://docs.microsoft.com/en-us/azure/api-management/api-management-howto-integrate-internal-vnet-appgateway)
  4. Configure the APIM Gateway Traffic manager to have an endpoint pointed the static public IP address of application gateway.


How traffic works with reference to Andrews post:

APIM-Traffic

View at Medium.com

Deploy API to API Management using Powershell via AzureDevOps

Recently I have to research on how to deploy API to API management using powershell via AzureDevOps. If you are looking for how to (below), you’re in the right place.:

– Deploy API to API management using AzureDevOps
– Build a CI/CD pipeline for API Management
– Deploy API to API management using Powershell
– Deploy Open API/Swagger to Azure API Management using AzureDevOps

These are your options;

  • Use APIM development resource kit
  • AzureDevOps add-ons
  • Powershell.

I find APIM development resource kit to be complicated and scary because it is deploying using ARM template (one wrong configuration and you can end up screwing the entire APIM).  The Add-ons is limited, specially if you need to deploy a policy.

In this blog, I’m going to cover the Powershell part. Below is the full script on how to deploy using powershell.


#Connect to Azure using Az Module
Connect-AzAccount

#Return all subscription
Get-AzSubscription
Set-AzContext -Subscription "{subscription Name}"

$resourceGroupName = "{resource group Name}"
$apimServiceName = "{APIM instance name}"
$openapiSpecs ="{open API specs JSON file name}"
$apiGlobalPolicy = "{API Policy XML file name}"
$apiPath = "{API Path}"
$apiId = "{API Id}"
$apiName = "{ API Name}"
$apiVersion = "{ API Version}"
$apiProtocols = @('https')
$apiServiceUrl = "{ Backend URL }"

# Create the API Management context
$context = New-AzApiManagementContext -ResourceGroupName $resourceGroupName -ServiceName $apimServiceName

# Check if it's already existing, if not a new versionset needs to be created, else use the existing one
# Version Set is unique by API, if there's an API with 2 versions there will be 1 version set with 2 APIs
Write-Host "[VERSION SET] Performing lookup. "
$versionSetLookup = Get-AzApiManagementApiVersionSet -Context $context | Where-Object { $_.DisplayName -eq "$apiName" }  | Sort-Object -Property ApiVersionSetId -Descending | Select-Object -first 1
if($versionSetLookup -eq $null)
{
    Write-Host "[VERSION SET] Version set NOT FOUND for: $apiName, creating a new one. "
    $versionSet = New-AzApiManagementApiVersionSet -Context $context -Name "$apiName" -Scheme Segment -Description "$apiName"
    $versionSetId = $versionSet.Id
    Write-Host "[VERSION SET] Created new version set, id: $versionSetId"
}
else
{
    Write-Host "[VERSION SET] Version set FOUND for: $apiName, using existing one. "
    $versionSetId = $versionSetLookup.ApiVersionSetId
    Write-Host "[VERSION SET] Reusing existing versionset , id: $versionSetId"
}

# import api from OpenAPI Specs
Write-Host  "[IMPORT] Importing OpenAPI: $openapiSpecs "
$api = Import-AzApiManagementApi -Context $context -SpecificationPath $openapiSpecs -SpecificationFormat OpenApi -Path $apiPath -ApiId "$apiId$apiVersion" -ApiVersion $apiVersion -ApiVersionSetId $versionSetId -ServiceUrl $apiServiceUrl -Protocol $apiProtocols
Write-Host  "[IMPORT] Imported API: $api.ApiId "  

# Apply Global Policy if existing
if (Test-Path $apiGlobalPolicy)
{
    Write-Host "[POLICY] Global Policy found applying : $apiGlobalPolicy "
    Set-AzApiManagementPolicy -Context $context -PolicyFilePath $apiGlobalPolicy -ApiId $api.ApiId
    Write-Host "[POLICY] Global Policy applied. "
}
else
{
    Write-Host "[POLICY] Global Policy NOT FOUND skipping : $apiGlobalPolicy "
}

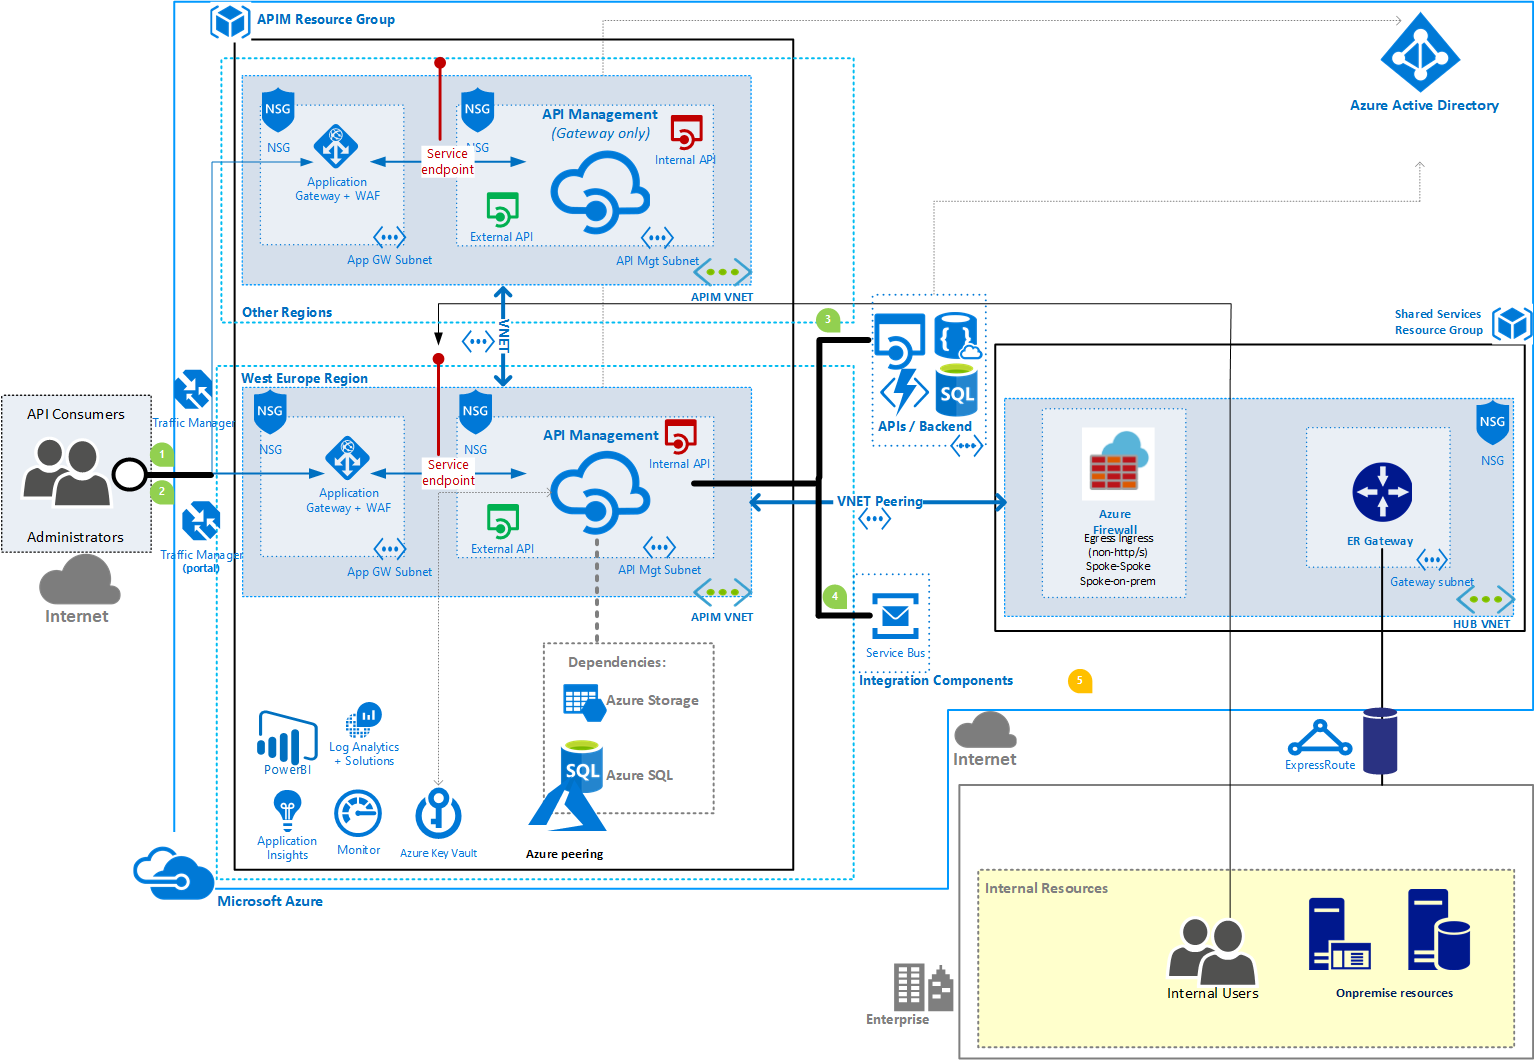
Now how do we integrate this with AzureDevOps?

Here’s how it would look like:

APIM-Release Management-RandyPaulo


Build Pipeline Configuration

1. Create a Copy files task that copies the .json and .xml (policy) to the build artifact

APIM-Build-Configuration

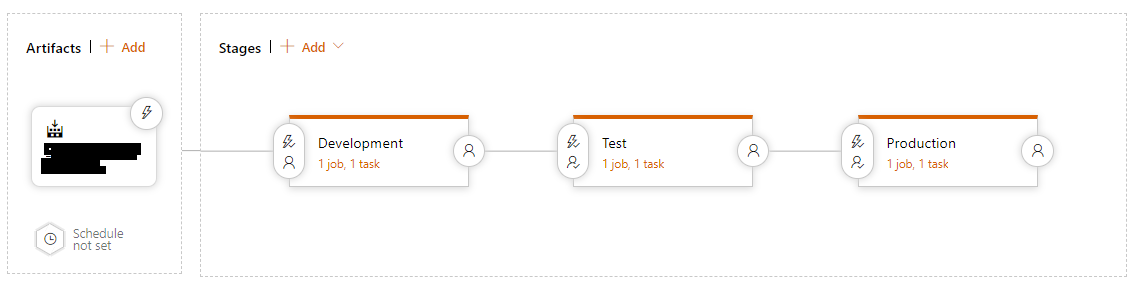
Release Pipeline Configuration

  1. Task Group -> APIM-Dev Deploy-Standard. I have to create 1 task group by environment since i don’t know how to parameterized the AzureSubscription.


APIM-Release-TaskGroup-RP

Powershell Script with Variables:

$resourceGroupName = "{resource group Name}"
$apimServiceName = "{APIM instance name}"
$openapiSpecs ="$(System.ArtifactsDirectory)\$(Release.PrimaryArtifactSourceAlias)\drop\$(OpenAPI-Filename)"
$apiGlobalPolicy = "$(System.ArtifactsDirectory)\$(Release.PrimaryArtifactSourceAlias)\drop\$(GlobalPolicy-Filename)"
$p = "$(System.ArtifactsDirectory)\$(Release.PrimaryArtifactSourceAlias)\drop\"

$apiPath = "$(API-Path)"
$apiId = "$(API-Id)"
$apiVersion = "$(API-Version)"
$apiName = "$(API-Name)"
$apiProtocols = @('https')
$apiServiceUrl = "$(API-ServiceUrl)"

$OpId1 = "$(OperationPolicy-OpId1)";$OpId1Policy = "$(OperationPolicy-OpId1-PolicyFile)"
$OpId2 = "$(OperationPolicy-OpId2)";$OpId2Policy = "$(OperationPolicy-OpId2-PolicyFile)"
$OpId3 = "$(OperationPolicy-OpId3)";$OpId3Policy = "$(OperationPolicy-OpId3-PolicyFile)"
$OpId4 = "$(OperationPolicy-OpId4)";$OpId4Policy = "$(OperationPolicy-OpId4-PolicyFile)"
$OpId5 = "$(OperationPolicy-OpId5)";$OpId5Policy = "$(OperationPolicy-OpId5-PolicyFile)"
$OpId6 = "$(OperationPolicy-OpId6)";$OpId6Policy = "$(OperationPolicy-OpId6-PolicyFile)"
$OpId7 = "$(OperationPolicy-OpId7)";$OpId7Policy = "$(OperationPolicy-OpId7-PolicyFile)"
$OpId8 = "$(OperationPolicy-OpId8)";$OpId8Policy = "$(OperationPolicy-OpId8-PolicyFile)"
$OpId9 = "$(OperationPolicy-OpId9)";$OpId9Policy = "$(OperationPolicy-OpId9-PolicyFile)"

$policies =@()
$policies+= @{ "OpId"= $OpId1;"x"= $OpId1Policy; }
$policies+= @{ "OpId"= $OpId2;"x"= $OpId2Policy; }
$policies+= @{ "OpId"= $OpId3;"x"= $OpId3Policy; }
$policies+= @{ "OpId"= $OpId4;"x"= $OpId4Policy; }
$policies+= @{ "OpId"= $OpId5;"x"= $OpId5Policy; }
$policies+= @{ "OpId"= $OpId6;"x"= $OpId6Policy; }
$policies+= @{ "OpId"= $OpId7;"x"= $OpId7Policy; }
$policies+= @{ "OpId"= $OpId8;"x"= $OpId8Policy; }
$policies+= @{ "OpId"= $OpId9;"x"= $OpId9Policy; }

Write-Host "Initializing APIM Resource Group: $resourceGroupName, API ServiceName: $apimServiceName"
Write-Host "API Definition: $openapiSpecs, API Path: $apiPath, API Id: $apiId, API Version: $apiVersion "

# Create the API Management context
$context = New-AzApiManagementContext -ResourceGroupName $resourceGroupName -ServiceName $apimServiceName

# Check if it's already existing, if not a new versionset needs to be created, else use the existing one
# Version Set is unique by API, if there's an API with 2 versions there will be 1 version set with 2 APIs
Write-Host "[VERSION SET] Performing lookup. "
$versionSetLookup = Get-AzApiManagementApiVersionSet -Context $context | Where-Object { $_.DisplayName -eq "$apiName" } | Sort-Object -Property ApiVersionSetId -Descending | Select-Object -first 1
if($versionSetLookup -eq $null)
{
Write-Host "[VERSION SET] Version set NOT FOUND for: $apiName, creating a new one. "
$versionSet = New-AzApiManagementApiVersionSet -Context $context -Name "$apiName" -Scheme Segment -Description "$apiName"
$versionSetId = $versionSet.ApiVersionSetId
Write-Host "[VERSION SET] Created new version set, id: $versionSetId"
}
else
{
Write-Host "[VERSION SET] Version set FOUND for: $apiName, using existing one. "
$versionSetId = $versionSetLookup.ApiVersionSetId
Write-Host "[VERSION SET] Reusing existing versionset , id: $versionSetId"
}

# import api from OpenAPI Specs
if($openapiSpecs -like "*wadl*")
{
$format = "Wadl"
}
else {
$format = "OpenApi"
}
Write-Host "[IMPORT] Importing OpenAPI: $openapiSpecs, format: $format"

$api = Import-AzApiManagementApi -Context $context -SpecificationPath $openapiSpecs -SpecificationFormat $format -Path $apiPath -ApiId "$apiId$apiVersion" -ApiVersion $apiVersion -ApiVersionSetId $versionSetId -ServiceUrl $apiServiceUrl -Protocol $apiProtocols
Write-Host "[IMPORT] Imported API: " + $api.ApiId

# Apply Global Policy if existing
if (Test-Path $apiGlobalPolicy -PathType Leaf)
{
Write-Host "[POLICY] Global Policy found applying : $apiGlobalPolicy "
Set-AzApiManagementPolicy -Context $context -PolicyFilePath $apiGlobalPolicy -ApiId $api.ApiId -Format "application/vnd.ms-azure-apim.policy.raw+xml"
Write-Host "[POLICY] Global Policy applied. "
}
else
{
Write-Host "[POLICY] Global Policy NOT FOUND skipping : $apiGlobalPolicy "
}

$policyctr = 1
foreach($policy in $policies)
{
$policyFile = $p + $policy.x;
if($policyFile -ne "")
{
if (Test-Path $policyFile -PathType Leaf)
{ Write-Host "[POLICY] Applying : " + $policyFile "on OpId:" + $policy.OpId
Set-AzApiManagementPolicy -Context $context -PolicyFilePath $policyFile -ApiId $api.ApiId -OperationId $policy.OpId -Format "application/vnd.ms-azure-apim.policy.raw+xml"
}
else { Write-Host "[POLICY] Policy: $policyctr has no operation id or policy xml defined. Skipping" }
}
else {Write-Host "[POLICY] Policy: $policyctr is empty skipping." }
$policyctr++;
}
Write-Host "[POLICY] Applied Operation Policy "

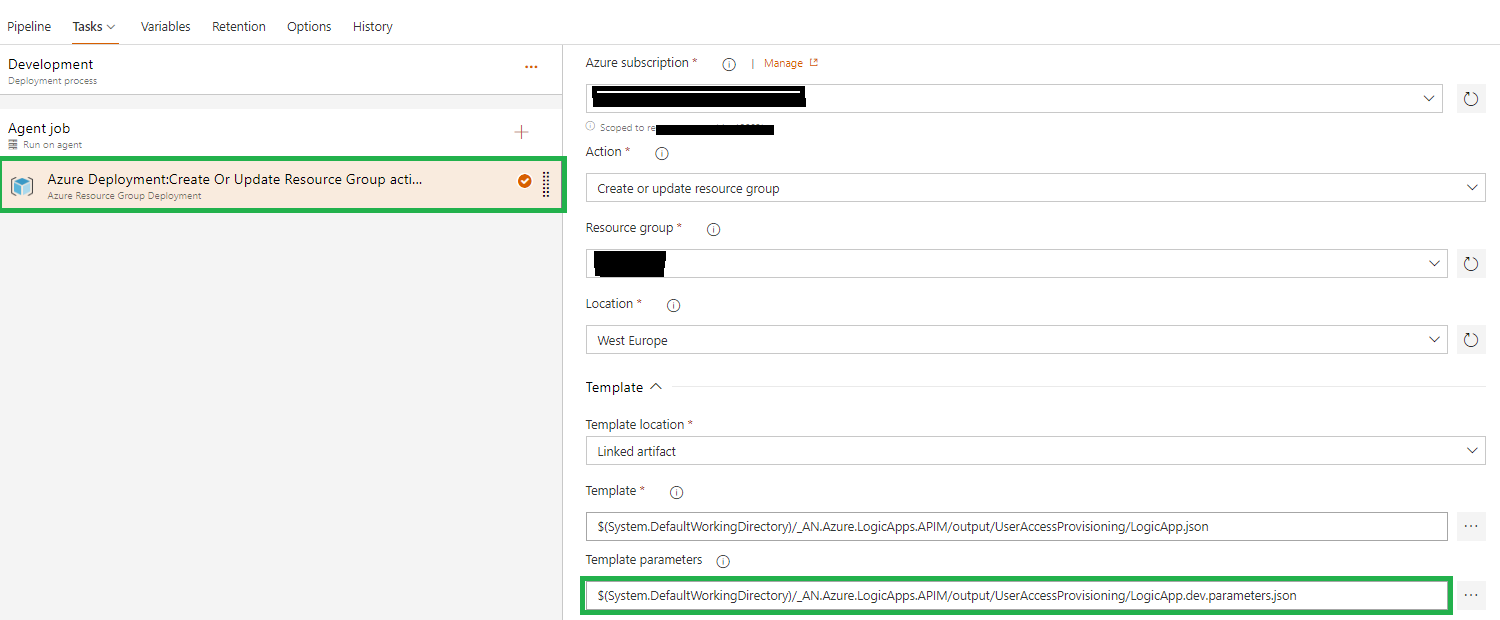
2. In the Release Pipeline, add the Task group and also parameterized it so you only need to change the variable of the release pipeline when cloning (very handy).

APIM-Release-Pipeline-RP

The Release pipeline variable, you only need to change this when cloning.

APIM-Release-Pipeline-Variables-RP.png


In action:

APIM-Powershell.png


Forgotten Password – How to get from Remote Desktop Connect Manager

After long vacation, celebrated christmas and new year, like most of people I have to go back to work. I’ve checked my emails and check some servers using Remote Desktop Manager. However when I needed to login to Azure Portal, I have to re-enter my credentials.. hmm. Looked at my one note (secure password 🙂 but the password seems to be not working. Went back to RDP Manager, however the password can’t be shown as clear text. Time for google.. How to decrypt the password from Remote Desktop Manager.

By using powershell script below (thanks to this link), you’ll be able to retrieve the password from the Remote Desktop Manager.

# Path to RDCMan.exe
$RDCMan = “C:\Program Files (x86)\Microsoft\Remote Desktop Connection Manager\RDCMan.exe”
# Path to RDG file
$RDGFile = “{<<PATH TO RDG FILE>>}”
$TempLocation = “C:\temp”

Copy-Item $RDCMan “$TempLocation\RDCMan.dll”
Import-Module “$TempLocation\RDCMan.dll”
$EncryptionSettings = New-Object -TypeName RdcMan.EncryptionSettings

$XML = New-Object -TypeName XML
$XML.Load($RDGFile)
$logonCredentials = Select-XML -Xml $XML -XPath ‘//logonCredentials’

$Credentials = New-Object System.Collections.Arraylist
$logonCredentials | foreach {
[void]$Credentials.Add([pscustomobject]@{
Username = $_.Node.userName
Password = $(Try{[RdcMan.Encryption]::DecryptString($_.Node.password, $EncryptionSettings)}Catch{$_.Exception.InnerException.Message})
Domain = $_.Node.domain
})
} | Sort Username

$Credentials | Sort Username


How to deploy Azure Logic Apps using Azure DevOps

If you’re looking answer for the following:

  • How to use Azure DevOps to deploy Azure Logic Apps?
  • How to do Continuous deployment of Azure Logic Apps using Azure DevOps?
  • How to develop Azure Logic Apps using Visual Studio and deploy it using AzureDevops?

You’re in the right place.

In this demonstration, I’ll be using the following tools / services

  • Visual Studio 2017 with Logic Apps Tools 
  • AzureDevOps (as of writing, they’re changing the product every 3 weeks)

Walkthough

  • Create Azure Logic Apps using Visual Studio 2017
    • Create multiple parameters per environment
  • Azure DevOps setup
    • Setup of AzureDevOps Service Connections
    • Setup of AzureDevOps Pipelines
    • Setup of AzureDevOps Release

Create Azure Logic Apps using Visual Studio 2017

  1. Open Visual Studio and connect to your AzureDevOps Instance
  2.  Once connected, Click File -> New Project -> Cloud -> Azure Resource Group

LogicAppProject

3. Select Logic app template and click next.

LogicAppTemplate

4. Open the logic app by Right Clicking the LogicApp.json -> Select Open With Logic App Designer.

LogicAppOpenDesigner

5. It will prompt the Logic App Properties, from here you’ll have to select the Subscription and resource group.

LogicAppSubscription

6. Develop the Logic App. You can copy from the list of template already available.

7. Create a copy of parameters file. In this example, I’ll create 3 different parameters files (dev, test and production). In the parameters file, i’ll use different logic app name per environment. The param file will be used later on in the AzureDevOps Release.

LogicAppsParams

8. Checkin the source code to Azure DevOps and later on we will link the Azure Pipeline to the source control.

Once this is done, we’re ready to configure and deploy using Azure DevOps.

Azure DevOps Setup

  1. Setup the Service Connection, this is needed when we configure the Release.
  2. Go to AzureDevOps project -> Click the Configure -> Pipelines -> Service Connections -> New Service Connection. Select Add an Azure Resource Manager service connectionAzureDevOpsServiceConnection
  3. Add a connection name. For the first example you can name it Azure Development. Create 2 more connections for Test and Production. In all cases, make sure to select a different resrouce group.
  4. Setup the Azure DevOps Pipelines, nothing special just do a Build of solution and Publish of artifact.AzurePipelineSetup
  5. Setup the Azure DevOps Release, overall it looks like this. and the configuration is repeating every stage (see #7). AzureReleaseView
  6. Development Stage Setup. You only need the Create Or Update Resource Group. Select the correct subscription (that we created in #1) and the template parameters (dev.parameters.json = Development)AzureReleaseSetup
  7. Clone the Development Stage to Test and Production.
  8. Only thing needs to be changed is the Subscription and the parameters.json file.


Testing

  1. Provided that you’ve setup the pipeline to do Continuous integration (Triggers-> Enable Continous integration). The moment you make changes to logic app and checkin the code. The Pipeline will be triggered.
  2. Once Pipeline succeeded, you can create a Release from it. This is how it looks like:AzureReleaseSuccesful


References:

http://www.integrationusergroup.com/continuous-integration-logic-apps-using-team-foundation-team-services/


BizTalk Map – Eliminate duplicate records using functoid

Recently there’s a requirement to eliminate the duplicate records in the output using BizTalk map.

Brilliant solution can be found here:

I’ve added step by step on how to do it.

Overall solution it looks like this:

Duplicate

You’ll need 2 script functiods and Equal logical functoid

  1. Top functoid will contain the declaration of variable with following code:

System.Collections.Specialized.StringCollection uniqueIds = new System.Collections.Specialized.StringCollection() ;

2.  Another functoid will take in the ID of source messsage wherein the uniqueness will be checked. In this case, CustomerId as input. The following code is as follows:

public bool IsUniqueId(string id)
{
if (uniqueIds.Contains(id))
return false;
uniqueIds.Add(id);
return true;
}

3.  Equal logical functoid will take the output of the second script functoid and output should be map to the target record


This is my input message:

<ns0:MasterData xmlns:ns0=”http://BizTalk_Server_Project1.Order”&gt;
<Customer>
<CustomerId>1</CustomerId>
<CustomerName>Customer 1</CustomerName>
</Customer>
<Customer>
<CustomerId>1</CustomerId>
<CustomerName>Deplicate Customer</CustomerName>
</Customer>
<Customer>
<CustomerId>2</CustomerId>
<CustomerName>Customer 2</CustomerName>
</Customer>
</ns0:MasterData>

And this is the output:

<?xml version=”1.0″?>

<ns0:MasterData xmlns:ns0=”http://BizTalk_Server_Project1.Order”&gt;

<Customer><CustomerId>1</CustomerId>

<CustomerName>Customer 1</CustomerName></Customer>

-<Customer>

<CustomerId>2</CustomerId>

<CustomerName>Customer 2</CustomerName>

</Customer>

</ns0:MasterData>


Viola!!, without using xslt you can achieve same results.

Azure API Management – How to set basic authentication in SendRequest

Scenario: I have both username and password stored in name value configuration of API management but I need to use it in SendRequest policy.

Source Code:

<set-variable name=“userName” value=“{{username}}” />

<set-variable name=“password” value=“{{password}}” />

<set-variable name=“basicAuthDetails” value=”@{

var username = context.Variables.GetValueOrDefault<string>(“userName”);

var password = context.Variables.GetValueOrDefault<string>(“password”);

return System.Convert.ToBase64String(System.Text.Encoding.GetEncoding(“ISO-8859-1”).GetBytes(username + “:” + password));

}/>

<set-variable name=“jsonPayload” value=”@{

JObject transBody = new JObject();

//Add all json Property

transBody.Add(“test”, JToken.FromObject(new[]

{

 “test data”

}));

}/>

<send-request mode=“new” response-variable-name=“var” ignore-error=“false”>

<set-url>@{

        var url = context.Api.ServiceUrl+ “/{someURL}”;

       return url;

}</set-url>

<set-method>POST</set-method>

<set-header name=“Authorization” exists-action=“override”>

<value>@(context.Variables.GetValueOrDefault<string>(“basicAuthDetails”))</value>

</set-header>

<set-header name=“Content-Type” exists-action=“override”>

<value>application/json</value>

</set-header>

<set-body template=“none”>@(context.Variables.GetValueOrDefault<string>(“jsonPayload”))</set-body>

</send-request>


That is how you can set basic authentication in SendRequest in Azure API Management.

Azure API Management Policy – Asynchronous API as Synchronous API

Below is the link to reference/examples of using Azure API management policy

There’s an example there on how to Mask Asynchronous calls as Synchronous API however for my requirement it’s not enough.

The target API behaves as follow:

  1. All operations are POST and asynchronous.
  2. To get the results of any operation a second API needs to be called and it’s expecting the transaction id.
  3. API expects a payload in command manner (args parameter) instead of proper JSON name/value pair.

Requirement: API should return the results in synchronous manner.

Solution:

API Callout Policy in API Management.

Steps: 

  1. Create a GET operation and via policy rewrite the operation to POST
  2. Create a JSON transformation logic in the inbound policy and execute the backend API.
  3. Create a JSON transformation logic in outbound policy and add a retry policy to execute the second API  that returns the result passing the transaction id from #2
  4. Return the results from second API.

Policy Code:

<policies>
<inbound>
<base />
<set-header name="Content-Type" exists-action="override">
<value>application/json</value>
</set-header>
<!-- Save authorization data to variable, to be used in outbound status request -->
<set-variable name="authorization" value="@(context.Request.Headers.GetValueOrDefault("Authorization"))" />
<!-- 
Construct the payload
-->
<set-body>@{
var paramFromRequest = Uri.UnescapeDataString(context.Request.OriginalUrl.Query.GetValueOrDefault("paramFromRequest"));
JObject transBody = new JObject();
transBody.Add("source", 
     new JObject
     {
         {"someproperty", "fixvalue"},
         {"someproperty2", "fixvalue2"},
     });

//Add all json properties as arg
transBody.Add("args", JToken.FromObject(new[] 
{ 
      paramFromRequest
}));
return transBody.ToString();
}</set-body>
<trace source="debug">@(context.Request.Body.As<string>(true))</trace>
<!--Remove additional query string -->
<set-query-parameter name="paramFromRequest" exists-action="delete" />
<set-method>POST</set-method>
<rewrite-uri template="{{FIRSTBACKENDAPI_URL}}" />
</inbound>
<backend>
<base />
</backend>
<outbound>
<base />
<!-- Get the Key from response -->
<set-variable name="jsonPayload" value="@{ 
JObject inBody = context.Response.Body.As<JObject>();
var transactionId= inBody["transactionId"].ToString(); 
string jsonString = "{\"transactionId\":\"_transactionId\" }";
var json = jsonString.Replace("_transactionId", transactionId);
return json;
}" />
<retry condition="@( Convert.ToBoolean(context.Variables.GetValueOrDefault<JObject>("status")["{{PROPERTYNAME IN JSON OBJECT RESPONSE}}"]))" count="10" interval="1">
<!-- Call Status API to get the results-->
<send-request mode="new" response-variable-name="var" ignore-error="false">
<set-url>@{ 
var url = context.Api.ServiceUrl+ "{{SECONDBACKENDAPI_URL}}";
return url;
}</set-url>
<set-method>POST</set-method>
<set-header name="Authorization" exists-action="override">
<value>@(context.Variables.GetValueOrDefault<string>("authorization"))</value>
</set-header>
<set-header name="Content-Type" exists-action="override">
<value>application/json</value>
</set-header>
<set-body template="none">@(context.Variables.GetValueOrDefault<string>("jsonPayload"))</set-body>
</send-request>
<set-variable name="results" value="@(((IResponse)context.Variables["var"]).Body.As<JObject>())" />
</retry>
<return-response>
<set-body template="none">@((context.Variables.GetValueOrDefault<JObject>("results")["{{PROPERTYNAME IN JSON OBJECT THAT CONTAINS THE RESULT}}"].ToString()))</set-body>
</return-response>
</outbound>
<on-error>
<base />
</on-error>
</policies>


Querying Azure SQL Database using Azure Functions 2.0 to return JSON data

The guide below shows how you can easily query Azure SQL Database using Azure Functions.

I have to admit, I have to do multiple google search and combine it for a working solution.

Challenges:

  1. How to get SQL connectionString from Azure Function settings. https://docs.microsoft.com/en-us/azure/azure-functions/functions-scenario-database-table-cleanup
  2. How to convert the sql results to JSON.  https://stackoverflow.com/questions/5083709/convert-from-sqldatareader-to-json

Steps:

    • 1. Create a new Function with HTTP trigger
    • 2. Add a new file called serialize.csx with following contents below. This will convert the SQL rows to a JSON like data.
using System.Text;
using System.Data;
using System.Linq;
using System.Configuration;
using System.Data.SqlClient;
using System.Collections.Generic;
using System.Collections;
public static IEnumerable<Dictionary<string, object>> Serialize(SqlDataReader reader)
{
var results = new List<Dictionary<string, object>>();
var cols = new List<string>();
for (var i = 0; i < reader.FieldCount; i++)
{
var colName = reader.GetName(i);
var camelCaseName = Char.ToLowerInvariant(colName[0]) + colName.Substring(1);
cols.Add(camelCaseName);
}

while (reader.Read())
results.Add(SerializeRow(cols, reader));

return results;
}
private static Dictionary<string, object> SerializeRow(IEnumerable<string> cols,
SqlDataReader reader) {
var result = new Dictionary<string, object>();
foreach (var col in cols)
result.Add(col, reader[col]);
return result;
}


3. In the run.csx, paste the following code. This will query the Azure SQL database and returns the data.

#r "Newtonsoft.Json"
#load "serialize.csx"

using System.Net;

using Microsoft.AspNetCore.Mvc;

using Microsoft.Extensions.Primitives;

using Newtonsoft.Json;

using System.Text;

using System.Data;

using System.Linq;

using System.Configuration;

using System.Data.SqlClient;

using System.Collections.Generic;

public static async Task<HttpResponseMessage> Run(HttpRequest req, ILogger log)

{

log.LogInformation("C# HTTP trigger function processed a request.");

string name = req.Query["name"];

string json =" ";

try

{

var str = Environment.GetEnvironmentVariable("<ConnectionStringName in appSettings>");


using(SqlConnection conn =new SqlConnection(str))

{

using(SqlCommand cmd =new SqlCommand())

{

SqlDataReader dataReader;

cmd.CommandText = "<SQL QUERY HERE>";

cmd.CommandType = CommandType.Text;

cmd.Connection = conn;

conn.Open();

dataReader = cmd.ExecuteReader();

var r = Serialize(dataReader);

json = JsonConvert.SerializeObject(r, Formatting.Indented);

}

}

}

catch(SqlException sqlex)

{

log.LogInformation(sqlex.Message);

log.LogInformation(sqlex.ToString());

returnnew HttpResponseMessage(HttpStatusCode.BadRequest)

{

Content = new StringContent(JsonConvert.SerializeObject($"The following SqlException happened: {sqlex.Message}"), Encoding.UTF8, "application/json")

};

}

catch(Exception ex)

{

log.LogInformation(ex.Message);

log.LogInformation(ex.ToString());

returnnew HttpResponseMessage(HttpStatusCode.BadRequest)

{

Content = new StringContent(JsonConvert.SerializeObject($"The following SqlException happened: {ex.Message}"), Encoding.UTF8, "application/json")

};

}

returnnew HttpResponseMessage(HttpStatusCode.OK)

{

Content = new StringContent(json, Encoding.UTF8, "application/json")

};

}
This shows how you can easily query the Azure SQL Database and return the data JSON in few minutes.
Perhaps next steps is to deploy this Azure Function into API management.


BizTalk – BTDF Compilation Error – ICE01

Current setup:

  • BizTalk Server 2016
  • Azure DevOps On-premise Build Agent

Error Message:

Error executing ICE action ‘ICE01’. The most common cause of this kind of ICE failure is an incorrectly registered scripting engine. See http://wix.sourceforge.net/faq.html#Error217 for details and how to solve this problem. The following string format was not expected by the external UI message logger: “The Windows Installer Service could not be accessed. This can occur if the Windows Installer is not correctly installed. Contact your support personnel for assistance

Solution:

Change the Log On As of VSTS Agent to Local System Account

  1. Run services.msc
  2. Look for the VSTS Agent Service
  3. On Tab change the Log On from Network Service to Local System account

Agent-LocalSystem